Stage 4 takes the observational drawings we have been working on so far, and uses these as a starting point to generate new ideas.
I decided to use some of the images I selected in Stage 3 for this exercise.
We were given some methods to use to help develop a series of visual ideas, such as:
- redraw using a different medium
- change the scale of a drawing by enlarging or reducing it
- select interesting bits of different drawings and redraw them together to make a new drawing or image
 |
| Calm |
I decided to make a repeat pattern using this image.
After struggling to use Photoshop, I managed to create the patterns on PowerPoint.
Using the computer made developing the pattern easy. I was able to rotate and flip the image to create this piece.
 |
| Repeat pattern of 'calm' |
I decided to remove the grey lines as I felt they were a visual distraction.
I painted sheets of paper with blue watercolour.
I cut out the images and created a collage that represented part of the repeat pattern.
This made the shapes within the image clearer, but the delicate colour changes that happened within the original sample were lost.
 |
| After removing the grey lines: 'Calm' |
I repeated the pattern with a vertical rotation.
Here the emphasis is on the lighter, central part of the reflection.
 |
| With vertical rotation |
I repeated the pattern further.
This time adding a vertical and a horizontal rotation.
I liked the result better.
The emphasis is now on the darker, central part.
The middle of the picture resembles figures reflected in the water, with buildings in the distance.
 |
| With vertical & horizontal rotation |
I went back to one of the earlier samples (the vertical rotation) and sliced the image into 1cm strips.
I placed and glued these on a white background.
I spaced the strips closely together near the edge, further apart towards the centre.
 |
| Slicing the image and placing it on white paper |
I used the same sample (vertical rotation) to weave with.
Using the photocopier I made 1 colour image, 1 black and white image.
These were cut and woven together to produce the following result.
 |
| Weaving with a colour and a black & white image |
First find your viewfinder..........
Image 2: this is one from a sketch featured in project 4, stage 3
 |
| Starfish |
I used the computer to repeat and rotate the image.
 |
| Starfish repeated and reflected. |
I then made the image smaller and carried on the process.
 |
| More repeats of the image |
I decided not to carry on working on this design, but will keep a record of it for future projects.
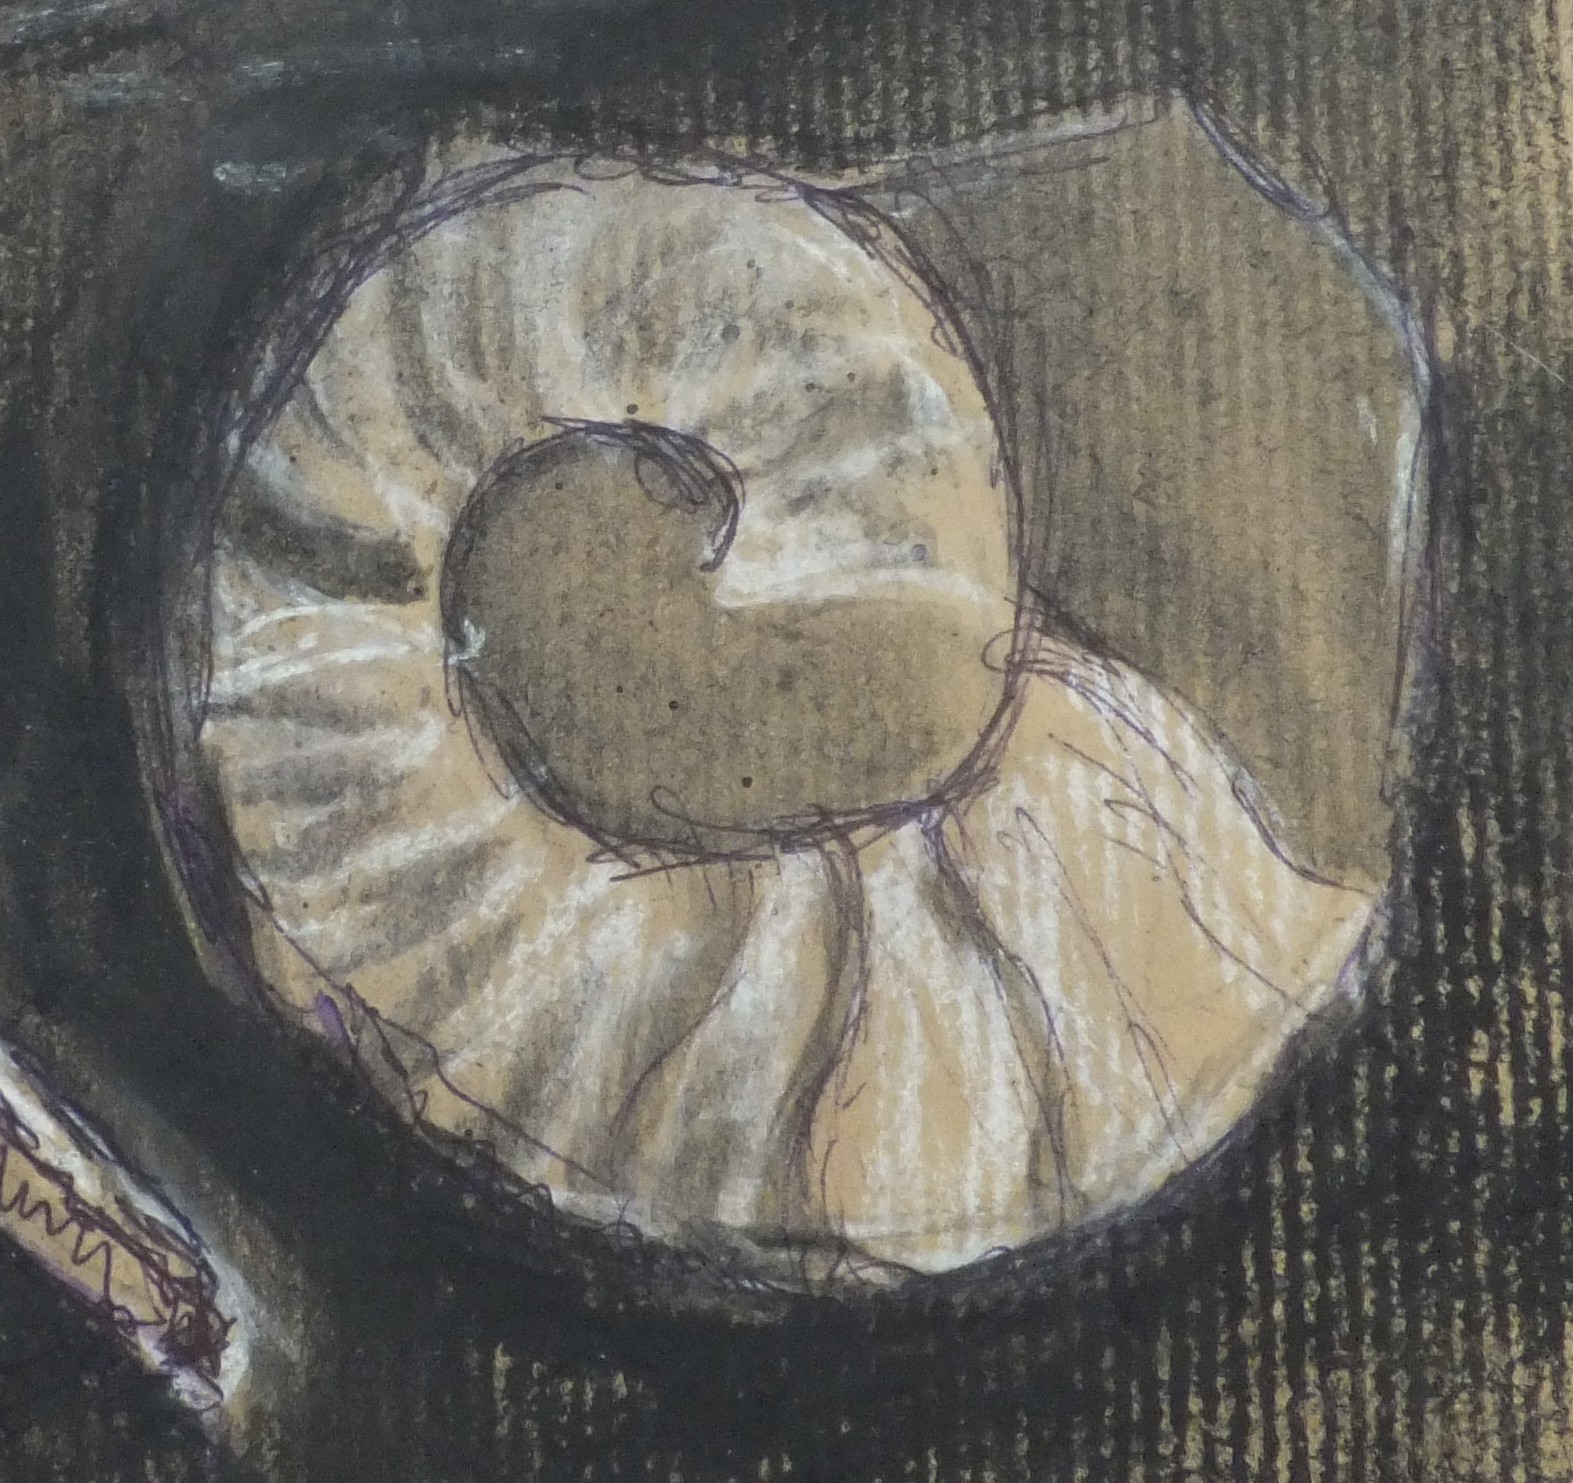
Image 3: from the same sketch as the starfish
 |
| Round shell |
The image was reduced in size, repeated and rotated.
 |
| Image of shell, repeated and rotated |
Marks and shapes appeared once the image was repeated that did not seem to be there in the original sketch.
I went on to develop a picture based on the repeat pattern.
I liked the colours of the original sketch so I kept to brown, beige, white and black.
Materials used were: brown craft paper, cardboard, soft pastels and charcoal.
 |
| Design based on repeat pattern of round shell |
It is very simple and would work well in a textile piece.
The next stage in the design process of this piece could have been to use brighter colours.
Image 4: from the same sketch as the starfish and round shell.
 |
| Shell |
The image was repeated and rotated.
 |
| Repeated and rotated shell. |
I then reduced the image and, using the computer, repeated and rotated the image again.
 |
| More repetitions and rotations of the shell |
I decided to work on the shapes of the shells.
I cut out several shapes from cream card and glued them down on brown paper.
I still liked the natural colourway of the original sketch.
 |
| Design using the shell shapes |
I then added drawn outlines of the shells, using charcoal and cream pastel.
I assessed the drawing again and added the ink marks to the cream card shells.
I used a different design on each shell.
I liked the drawing but still felt it lacked depth.
I decided to cut out parts of the brown paper.
Originally I was going to cut out small pieces from all over the image.
As I was cutting I realised these small cuts were very effective at leading the eye.
This was when I made the decision to cut out pieces from a small section of the picture.
I am really happy with the final image that I created.
It is very different from the starting point of the single shell.
This image resembles sand with the water running over, and in between, the shells embedded in it.
Conclusion.
I started this project with reluctance.
I felt I had done the development and design already at other stages in the course.
BUT, I am glad I persevered and developed these designs.
I like the work that I produced.
I was glad that I mastered the computer (although not Photoshop) so that I was able to produce the repeat patterns easily.
I remembered how much enjoyment is gained once you produce your own, original piece of work.
I know that sometimes ideas flow automatically, a piece or drawing can inspire you.
Sometimes that is not the case.
That is when these methods and ways of working will come in really useful, new ideas were generated easily by going through a few, simple stages.
--------------------
Finished Pages:


No comments:
Post a Comment