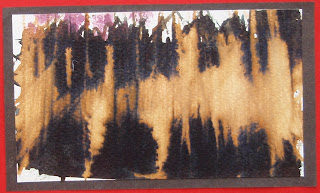
Time has passed since my last pieces of work were completed..... I started teaching in school, I went to India, I had an operation on my hand.
Things just got in the way! I was finally unable to multi-task and be everything to everyone.
I am now working less hours - now working in a ladies arts centre here in Saudi Arabia, just a few sessions a week. I have been able to spend more time with my family and finally, felt able to restart my course work.
I have been to art exhibitions, read (and bought!) lots of new art and textile books and have been filling up some sketchbooks....more about those later.
I started reading up on the stage 4 ...and was initially confused. Everytime I thought about starting, I looked at the exercise in a different way. Finally - I just got down to it.
Looking at Stage 3 - we started working from photographs. Then the next stage was to work from real objects. Stage 4 was to work in a similar, textural way from our sketchbooks.
I chose 3 pictures - and, using a viewing frame - isolated areas from each that had some interesting textures. I plan to create sketches from these each using a different technique or media.
Arabic basket: These are beautiful objects - made by arabic women, from palm leaves. The strips of leaves are gathered together in one hand and stitched (almost like couching) together to form a very strong, usable basket. The colours and styles are amazing.
 |
| Sketch of arabic basket from the top and the side |
I made a printing block by glueing a square of foam onto a pencil.
By dipping this into the different colours of acrylic paint, I created this:
 |
| Arabic basket - printing produced from sketch |
I would like to experiment with different joining techniques.
Look at creating fragments of cloth.
Investigate the history and the different ways the baskets are made.
The finished page:
 |
| Finished page - Arabic baskets |
Landscape sketch: This was drawn while we were on a trip to South Africa last April.
 |
| Moholoholo, South Africa |
I chose part of the sketch that depicted the tangled foliage that appears to hang down towards the ground.
 |
| Tangled undergrowth |
Sketch 1: repeated stencils of part of the image. Using yellow, green and turquoise inks.
 |
| Sketch 1 |
This was possibly due to the colours being too similar to each other - if a darker blue, rather than turquoise, had been used - the effect might have been better.
Sketch 2: repeated stencils of part of the image. Using yellow and green ink.
 |
| Sketch 2 |
The work shows the changes in colour.
Further work:
I would like to try this using screen printing.
Overlaid sheer fabrics may work well.
The finished page:
 |
| Stencilled sketch - South African landscape |
Landscape sketch: Using the same South African sketch:
 |
| Moholoholo, South Africa |
I chose part of the sketch, the tree trunk, that had lots of texture.
It has lots of cross hatching.
 |
| Tree trunk |
Sketch 1: Using ink and bleach:
 |
| Ink and bleach 1 |
Also - I applied the bleach with a reasonably large brush, maybe a smaller one would have been better.
Sketch 2: Using ink and bleach:
 |
| Ink and bleach 2 |
I used a smaller brush.
I let the ink dry slightly before I applied the bleach.
I continued to scratch into the surface as it was drying - this added some ink lines back into the bleached areas.
Sketch 3: Using ink and bleach:
 |
| Ink and bleach 3 |
The lines were scratched with bleach using the metal edge of a pallette knife, so the bleach did not flow as far as before.
Further work:
I would like to try discharge techniques on dyed fabric.
Burnt edges of fabrics overlaid.
The finished page:
 |
| Ink and bleach South African landscape |
Landscape sketch: This one was drawn in the summer in England. It has some really nice marks made from a mapping pen and ink.I also like the different greens that appear from the overlaid washes of watercolour.
 |
| England in the summer |
 |
| Sketch through a viewing frame |
 |
| Collage |
I would really like to take this further - the variety of fabrics, papers, stitches that could be used to work on this sketch, is endless.
The finished page:
 |
| Finished page - English landscape |
A sketch is just that - it's not a finished piece of work - just a starting point.
Follow the direction the sketch takes you. Try out different techniques and mediums.
Make notes of your thoughts - you may come back to them later.
Be organised! Gather your materials - that way you can try out different ways of working without having to find everything.
The last point is one I'm still working on.........!

No comments:
Post a Comment