Friday, May 6, 2011

Part One: Project 2 - Stage 5

Saturday 30th April 2011 - Stitches which Create Texture

In Stage 5 we are asked to use stitches which create texture and to explore the effects of the stitch, to vary the density and create rich effects.

Initially I used hand embroidery, the stitch chosen was satin stitch.
Threads: Stranded cotton, Tapestry wool, Cotton perle.
The fabric: Calico stretched on an embroidery hoop.

This is the first sample:
I worked thick, tapestry wool threads against fine stranded cotton, and,  matt yarn - tapestry wool against shiny cotton perle.

I worked blocks of stitches in a horizontal direction, against blocks of stitches worked in a vertical direction.
Some of the stitches were arranged in diamond shapes.

The colour changed from grey to light blue to a darker bluey grey.
Sample 1: satin stitch using a variety of colours and threads
The horizontal stitches appear darker than the vertical stitches.

The thicker, smoother cotton perle thread showed up the structure of the stitch best - but because of the sheen of the thread, also reflected the most light.

The stranded cotton has the smoothest texture.

When the stitches were arranged horizontally and vertically, they appeared to have a flat surface; when the stitches were arranged in a diamond shape, the stitches appeared to undulate across the surface - receding into the middle of the diamond.

The roughness of the tapestry wool meant that the individual stitches were less distinct than the smoother threads.

I really like this sample, it is rich in colour and texture.

                                                            ---------------------------------

Sample 2:
Method: I used hand embroidery, the stitch chosen was satin stitch.
Threads: Stranded cotton, artificial silk.
The fabric: Calico stretched on an embroidery hoop.

I used thicker silk threads and a finer stranded cotton in a single colour: green.

I worked blocks of stitches in a single direction, each block  had a different quantity of stitches in them.
Sample 2: Satin stitch using silk and stranded cotton threads
The sample created a real optical illusion - the blocks appeared to be spaced differently, even though the blocks and spaces were of equal size.

The larger the quantity of stitches in each block - the further away and darker, the block of stitches appeared to be, they appear to recede.

The fewer quantity stitches in each block made the block appear larger and brighter and nearer.

The silk threads appeared to be closer and darker, they were shinier and drew the eye in.

The sample was interesting to make, and it was a pleasure to work with the silk thread (even if it was an artificial silk!).

                                             --------------------------------------------------

Sample 3:
Method: I used hand embroidery, the stitch chosen was running stitch.
Thread: Stranded cotton.
The fabric: Calico stretched on an embroidery hoop.

I used stranded cotton in a single colour: grey.

I worked stitches in a single direction, changing the size of the spaces between each stitch, and between each row.
Sample 3: running stitch using stranded cotton
The sample created another optical illusion - the stiches appear to be closer to the eye in the middle, and recede towards the top and bottom of the piece.

The further apart the stitches and rows were - the nearer that part of the fabric surface appeared to be.
The closer together the stitches and rows were - the further away that part of the fabric surface appeared to be.

The thread colour appears darker when the density of the stitches is heavier.

I liked this sample - the fabric and the stitches are flat and smooth and yet the stitched sample appears curved like a tree trunk (when looked at rotated 90 degrees)..

                                          ----------------------------------------------------

Sample 4:
Method: I used hand embroidery, the stitch chosen was running stitch.
Thread: Stranded cotton.
The fabric: Calico stretched on an embroidery hoop.

I used stranded cotton in a single colour: grey.

I worked stitches in a multiple directions, this changed the density of the stitches across the surface.
Sample 4: running stitches using stranded cotton
This sample was really 'cross-hatching' in stitch.

The denser the stitching - the darker the colour of the thread.

The stitches worked in this way added texture to the surface of the background.

It would be interesting to take this sample further, changing the colours of the thread to see what other effects this creates.

                                            -----------------------------------------------------

Sample 5:
Method: I used hand embroidery, the stitch chosen was herringbone stitch.
Thread: Stranded cotton.
The fabric: Calico stretched on an embroidery hoop.

I used stranded cotton in a single colour: light grey.

I worked stitches in a single direction, altering the spacing and quantity of stitches in each column.
Sample 5: Herringbone stitches in stranded cotton
The centre of each stitch creates texture and appears darker, when the herringbone stitch is worked in rows.

The further apart the stitches are in each column - the lighter the thread appears.
The more densely spaced the stitches - the darker the thread appears.

Changing the colours of thread would also affect the dark and light side of the stitch.

Once the embroidery hoop was removed from the fabric, the stitches appeared to be loose - almost floating on the fabric surface - a nice textural effect.

                                            ------------------------------------------------------

Sample 6:
Method: I used hand embroidery, the stitch chosen was long running stitch.
Thread: Stranded cotton and artificial silk.
The fabric: Calico stretched on an embroidery hoop.

I used stranded cotton and art silk in a single colour: green.

I worked stitches in a multiple directions, starting with the stranded cotton, working over with silk, then finishing with the stranded cotton.
Sample 6: long stitches in art silk and stranded cotton
This sample had lots of texture, again, once the embroidery hoop was removed, the stitches floated on the surface of the fabric creating even more texture.

The use of just one single colour allowed the qualities of the threads to show up. The silk being thick, shiny and lustrous, against the duller, finer stranded cotton.

Again, the density of the stitching created dark and light areas of stitches.

Once the silk thread had been stitched - the stranded cotton could hardly be seen - this was rectified by overstitching with the stranded cotton once more.

I liked using the longer stitches, they created good directional lines and movement.

                                            ------------------------------------------------------

Sample 7:
Method: I used hand embroidery, the stitch chosen was long running stitch.
Thread: Stranded cotton.
The fabric: Calico stretched on an embroidery hoop.

I used stranded cotton in complimentary colours: red and green.

I worked stitches in a multiple directions, starting with the green stranded cotton, then working over with the red stranded cotton.
Sample 7: long running stitches in stranded cotton
The use of complimentary colours really livened up this sample, the red thread appears to stand out against the background.

The denser the stitches - the darker the colour the thread appears.

This was the only sample where I looked at the effects of colour in the sample - all the others used either the same colour or a harmonious range of colours.

                                            ---------------------------------------------------

Sample 8:
Method: I used hand embroidery, the stitch chosen was running stitch and couching.
Thread: Stranded cotton and tapestry wool.
The fabric: Calico stretched on an embroidery hoop.

I used stranded cotton and tapestry wools in different blues.

I worked stitches in a circular direction, going from light to dark shades of blue, increasing the distance between the stitched lines.
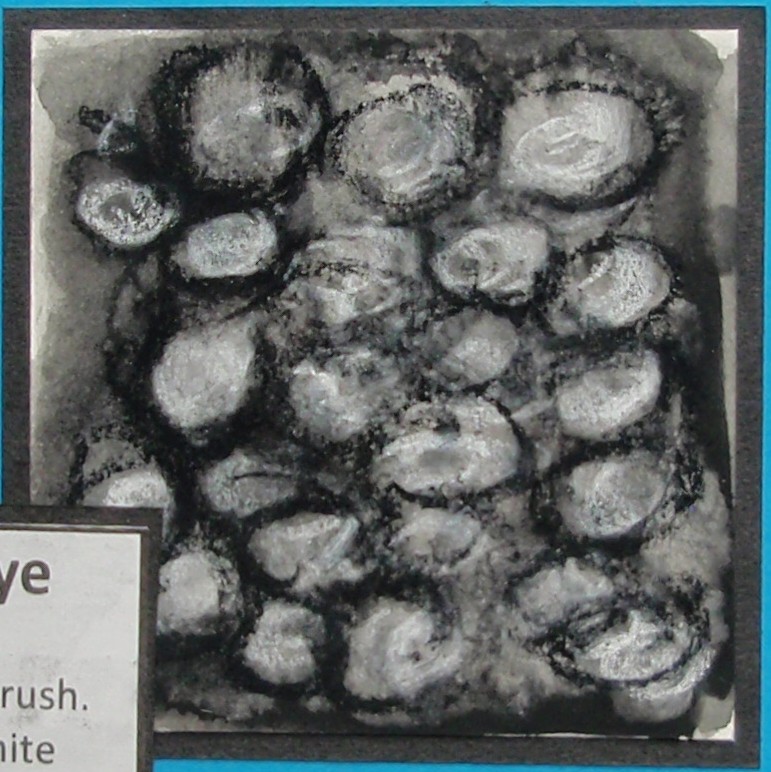
Sample 8: running stitch and couching in stranded
and tapestry wool.
The couching stitch was perfect to create the flowing lines.

When the lines were close together, no background fabric showed through.
As the lines were made further apart, fabric showed through and it became lighter.

Stranded cotton being stitched between the lines of couching added depth to the piece, as well as adding shadows of colour.

This was my favourite sample to make - I like the flowing lines and the gradual changes of colour.

                                      -----------------------------------------------------

I feel happy that I have a visual record of stitch textures to refer to for the forthcoming exercises.
I have enjoyed making these samples, although they took a long time to create. I should have reduced the stitching area, this would have reduced the time spent on them.

Although the last sample was my favourite one to stitch, I really liked the optical illusions created by stitching samples 2 and 3.
By stitching closely together and then far apart, the stitches looked nearer and then further away.

I know that I need to create a sample to relate these effects to, only then will they start to really make sense to this part of the project. I am going to look back through my work and sketches to find the right drawing to do this with.
                                             ---------------------------------------------

The finished pages
Stitches which Create Texture - 1

Stitches which Create Texture - 2

Stitches which Create Texture - 3
                                       ------------------------------------------------------------

Monday, May 2, 2011

Part One: Project 2 - Stage 4

Saturday 23rd April - Preparing to Create Textures.

In this stage we are asked to look more closely at textures. To recreate the qualities of an image - not just to copy it.

I have collected together and am going to look through my texture exercises from Project 1, also other relevant drawings that I have done since.

From these I am going to select a few drawings that I would like to develop further - describing the texture of each in words; collecting yarns and fabrics that would match the qualities of each piece; deciding which approach would be best to express the effect in each drawing.

Texture 1 : Smooth
Bulb of garlic: pastel
This sketch was done in soft pastels on the back of an envelope.

I felt the best word to descride the texture was smooth - other words could be: unwrinkled, flowing, peaceful, rhythmic, undisturbed and uninterrupted.

Yarn and fabric choice:
I chose a smooth, creamy background fabric - calico.
The thread being used is stranded cotton - this has a nice sheen to it and a wide range of colours.
I will use 3 colours in a similar colour range - cream, light pink, mid pink - to create a subtle effect.

Technique:
The stitch used is split stitch allowing one colour to seamlessly blend into the next.

Finished sample:
The colours flow smoothly from cream through to pink.
The surface is uninterrupted and undisturbed.
Smooth - split stitch
                                              ------------------------------------------------

Texture 2: Distorted
Tin can - charcoal
This sketch was from the texture exercises - charcoal on cartridge paper, showing the texture of a shiny, aluminium can.

I felt the best word to describe the texture was distorted - other words could be: deform, bend, buckle or misshape.
The shiny surface of the can distorted the reflection.

Yarn and fabric choice:
I chose a loosely woven, creamy background fabric - muslin.
The loose weave will allow the threads to shape and move the fabric when stitched.

The thread being used is stranded cotton - this has a nice sheen to it, which will contrast with the matt cream background fabric.
I will use red - to create a rich effect against the paler background.

Technique:
The stitch used is running stitch allowing dark and light effects to show as the stitches overlap.

Finished sample 1:
The red thread became darker as the stitches overlapped and lighter where they didn't, creating a distorted optical illusion.
The surface started to buckle as the stitching became heavier.
Distorted sample 1: running stitch
Having created this sample, I felt I would like to take this further and use stitches that would distort the fabric even more.

Yarn and fabric choice:
I chose a loosely woven, creamy background fabric - muslin.
This worked well with the first sample - the loose weave distorted when stitched.
This time I used 2 different threads: Tapestry wool which has a matt finish and a fine crochet cotton with a sheen.
I will use 2 shades of green - this time the rich effect is created by the difference in thread rather than the colour.

Technique:
The stitches used are lazy daisy and running stitch.
Both will distort and buckle the fabric as they are stitched.

Finished sample 2:
The surface started to buckle as the stitching became heavier, the lazy daisy stitch was able to form holes in the fabric as the weave pulled apart.
The 2 contrasting threads - one shiny, one matt, created a good textural effect.
Distorted sample 2: lazy daisy and running stitch
                                           ---------------------------------------------------

Texture 3: Bumpy
Pebble dashed wall: watercolour, bleach, soft pastel
This sketch was from the texture exercises - watercolour,bleach and soft pastel, showing the texture of a lumpy,bumpy pebble-dashed wall.

I felt the best word to descride the texture was bumpy - other words could be: bumpy, irregular, thick and uneven.

Yarn and fabric choice:
I chose a woven, beige background fabric - linen.
The looser weave of the linen will allow the thicker threads to be stitched more easily.
I will use 2 different types of thread: matt tapestry wool and stranded cotton - which has a sheen.
I will use a range of complimentary colours to create excitement and tension.

Technique:
The stitches used are lazy daisy stitches - these will be stitched randomly, and in different sizes, across the fabric surface.
Using the wool first, followed by stranded cotton will create a lumpy, bumpy surface.

Finished sample:
The 2 contrasting threads - one shiny, one matt, created a good textural effect.
The stitch used created bumps on the surface.
The complimentary colours - purple and yellow created a good visual effect - a lumpy, bumpy visual look.
Lumpy sample: lazy daisy stitch
                                         ------------------------------------------------------

Texture 4: Ridged
Corrugated card: oil pastel
This piece was from the texture exercises - corrugated card and oil pastel, the yellow and red oil pastels show up the corrugations in the card.

I felt the best word to descride the texture was ridged - other words could be: corrugated, furrowed, ribbed, rucked and wrinkled.

Yarn and fabric choice:
I chose a woven, beige background fabric - linen.
The looser weave of the linen will allow the thicker threads to be stitched more easily.

There are 2 threads being used: a thick twine and silk thread  - the twine will be thick, bulky and rough in texture, the silk will be smooth, shiny and lustrous.

Technique:
The stitch used is couching - the yellow silk thread couched over the beige twine will create ridges on the surface of the fabric.

Finished sample 1:
The silk thread created a beautiful shiny stitch, reflecting light - creating shadows where the ridges met.
The stitch used created ridges on the surface.
Ridged sample 1: couching
Having created this sample, I thought I would like to experiment with a another type of thread to see the difference.

Using the same background fabric and twine, the couching thread was changed to a metallic thick thread.

Finished sample 2:
The metallic thread created a different effect from the silk; the light sparkled, it was a rougher more textured finish.
The stitch used created ridges on the surface.
Ridged sample 2: couching

I found another good example of a ridged texture from one of the exercises - this time it was from a printing sample.
Printing with a bottle top
Having experimented with couching I thought I would try another approach to creating ridges.

Yarn and fabric choice:
I chose a woven, beige background fabric - linen.
The looser weave of the linen will allow the thicker threads to be stitched more easily.

The thread being used is crochet cotton- this has a sheen to it, which will contrast nicely will the matt beige background fabric.

Technique:
The stitch used is buttonhole stitch - the buttonhole stitch applied to threads stretched across the surface in rows, creating a crocheted fabric.
The 'fabric' will be applied to the base of linen at intervals to form ridges and waves.

Finished sample 3:
Light and shadow was created due to the shine and texture of the stitches.
It made a nice texture sample - but possibly not the best way to create a ridged texture.
Ridged sample 3: buttonhole stitch
                                         ------------------------------------------------------

Texture 5: Crusty
Slate wall: photo
Although this is a photograph - it is one that I have used when working on the texture exercises.
.
I felt the best word to descride the texture was crusty - other words could be: crisp, hard, crunchy, rough, knobby and lumpy.

Yarn and fabric choice:
I chose a woven, beige background fabric - linen.
I liked the close weave and the colour of the fabric.
The thread being used is stranded cotton - this has a sheen to it, which will contrast nicely will the matt beige background fabric, and has a variety of colours available.

Technique:
The stitch used is French knots - these will sit on top of the surface of the fabric, creating a crust.
A similar colour range will be used in the thread choice.

Finished sample:
The stitch created a crust on the fabric surface, it was crunchy and lumpy.
A similar range of colours used gave the sample the look of a surface that was crusty - the colours of the top of a freshly baked loaf of bread.
Crunchy sample: French knots
                                       --------------------------------------------------------

I had intended to use a bigger variety of materials to create these samples - but somehow the stitches made with thread, won.
The beads, plastics, buttons etc stayed in their bags.

I enjoyed planning out and thinking the samples through before I started working on them - sometimes my ideas changed as I was stitching,  eg, the red sample for distorted, this was not what I had planned to create at all - but I liked the way it turned out.

My favourite sample was the last one - I loved working the french knots, and creating the colour changes. The sample took far too long to make - but I enjoyed the process of stitching it.
                                              -----------------------------------------------

The finished pages:
Smooth and Distorted Stitch samples

Bumpy and Ridged Stitch Samples

Crusty Stitch Sample
                              --------------------------------------------------------------------

Saturday, April 23, 2011

Part one: Project 2 - Stage 3

Saturday 18th April - A sample

I am looking through my work and sketches to find a drawing with strong lines or linear qualities.
From the drawings I select, I will use a viewing frame to isolate part of the drawing.
I am looking for an area which is not too complicated and has lots of variety in the lines.

I have pinned  up both my drawings and my stitching examples from Stages 1 and 2 for inspiration and help in this exercise.

Picture 1:
This was the first drawing that I thought I would look at. It has strong lines and linear qualities - also it is monochromatic - making it easier to look at the lines and textures.
Sketch 1 with strong lines
Using a viewing frame I isolated this area: It has thick lines against thin, broken lines against continuous.
After using a viewing frame to isolate an area
The threads I thought I would use are stranded cottons - I have lots of them in a range of colours.
They can be used as a single or a multiple strand when worked in stitch.
They have a nice sheen.
I felt the area chosen had a calm feel to it.
Sample 1 - Calm
This is the sample I produced based on the area that was identified.
I used 2 shades of blue - a dark and a light - both with 2 strands of thread.
I stitched the dark threads close together vertically.
The light threads were stitched with running stitch - some close together, some far apart, in a horizontal direction.

The sample ended up looking like a seascape.
The light blue stitches 'rippled' like water, the spacing of the stitches gave the picture depth.
The darker blue stitches looked like rocks rising out of the water.

There were no clashes of colour, no dramatic changes of texture
Both the colours used, the type of threads used and the stitches chosen - gave the sample a calm feel to it.

                                         --------------------------------------------

Picture 2:
This was the second drawing that I thought I would look at - it is also monochromatic, has strong lines and linear qualities.
Sketch 2 with strong lines
Using a viewing frame I isolated this area - it has thick lines against thin, broken lines against continuous, and curved against straight.
After using a viewing frame to isolate an area
The threads I thought I would use are stranded cotton and a machine thread - to create different thicknesses.
I am going to use a plain cream background.
The area chosen looks distressed and broken.
Sample 1 - distressed and broken
The machine thread worked well - it was thin and 'spiky'. It also wove between the stitches well to create the curved horizontal lines.
The stitches worked well - lines and crosses created a distressed and broken image - none of the stitches were worked too closely together - no smoothness.
The stranded cotton provided the thicker lines.

Although I liked the sample - it lacked something....so I tried another.
This time using the same threads, slighlty different stitching techniques and a coloured background.
Sample 2 - distressed and broken
I used fabric pastels to colour the fabric - red to represent 'distress'.
The stranded cotton was used first - more stitches were used down the centre than last time - overlapping all the stitches in random directions.
The machine cotton was used over the top - again using long thin lines crossed over each other.

I liked the coloured background, it was a distressed background.
I liked the stitches - they were broken and haphazard.
But it was still very flat.

So I tried a third sample.
Sample 3 - distressed and broken
This is my favourite.
I have used a dark, distressed background - using fabric pastels.
I used 3 types of cream thread - stranded cotton, crochet cotton and cotton perle.
The thinnest thread was worked first in large criss-crossed stitches - then the crochet thread in smaller stitches, finally the cotton perle was worked along the centre.

Overlaying the threads worked well - it gave the area a cross hatched effect - the deepest shade of cream at the centre.
The different types of thread used created more texture.
The stitches were broken and distressed..... it created the look of a crack in a wall with the light shining through.

                                                 ----------------------------------------

Having the drawings and stitching examples pinned up was a great visual reference.
I knew what materials I had from creating the colour bags, without having to search for everything - this reduced the amount of work that needed to be done before starting.

I liked the first sample as soon as i had done it, the way the stitches were placed changed as i worked on it. It was spontaneous and looked good.
The second set of samples became more spontaneous the more I worked on them - maybe I had thought too much before the stitching started - I was happy with the final result though.

Now to create texture in Stage 4!
                                     --------------------------------------------------------

The finished pages:
Stitch sample developed from a sketch

More finished samples
                                     -------------------------------------------------------------

Part One: Project 2 - Stage 2

Friday 15th April: Exploring Marks and Lines through Stitch Techniques

This stage is to explore the different effects that can be created with stitch.

I am going to use a limited pallette of colours and a plain cream background fabric, so that the effects the stitches produce will show up best.

I will use hand stitch using a range of line stitches eg. running, stem, back, chain stitch, etc.

                                            ----------------------------------------------------

Sample 1:
Sample 1
Sample 1 shows running stitch created using 1 strand of dark brown cotton thread.
I started stitching the lines far apart and gradually the lines became closer together.
The colour intensified as the stitches were placed closer together.

                                          ------------------------------------------------------

Sample 2:
Sample 2
Sample 2 shows running stitch produced with 2 strands of cotton.
The lines were stitched further apart, then closer together - this time with a less regular pattern.
Again, the closer the stitches were together the darker the colour of the thread appears.

                                          ------------------------------------------------------

Sample 3:
Sample 3
 Sample 3 shows running stitch with 2 strands of cotton thread and couching with soft cotton thread. I used another organised sequence - the fewer lines of soft cotton used, the more lines of stranded cotton were stitched. The couching was placed at irregular intervals.
This produced a nice contrast when the matt threads were placed next to the shiny threads.

                                       --------------------------------------------------------

Sample 4:
Sample 4
Sample 4 shows running and back stitches using a soft cotton thread.
The stitches cross over each other and also are placed close together, then further apart.
Rich textures were produced by overlapping the stitches and placing the stitches close together.

                                         -------------------------------------------------------

Sample 5:
Sample 5
Sample 5 shows satin stitch worked in cotton perle threads.
The stitches were worked in opposite directions.
The colour of the stitches appears darker when stitched horizontally and lighter when stitched vertically.

                                               -----------------------------------------------

Sample 6:
Sample 6
Sample 6 is satin stitch worked in 2 strands of cotton.
The effect produced is the same as sample 5: Colour of stitches appears darker when worked horizontally.

                                              -------------------------------------------------

Sample 7:
Sample 7
This sample shows random small running stitches worked in cotton perle.
A nice texture is produced when the stitches are worked in random directions.
The stitches appear darker and lighter depending on how the light catches them.

                                               ----------------------------------------------------

Sample 8:
Sample 8
Sample 8 shows 2 rows of chain stitch worked in a soft cotton thread.
The chain stitch produced was full of texture when worked in soft cotton rather than a stranded cotton.

                                              ----------------------------------------------------

Sample 9:
Sample 9
Sample 9 has chain stitch and running stitch worked 2 strands of cotton.
The stranded cotton produced a nice flowing, circular line.
As the stitches were worked close together, the colour became darker.

                                        -------------------------------------------------------

Sample 10:
Sample 10
Sample 10 shows stem stitch worked in soft cotton thread.
The stitches formed a spiral.
The stitches are textural and distinct due to being worked in a soft cotton thread.

                                         -------------------------------------------------------

Sample 11:
Sample 11
Sample 11 shows running stitch worked in both soft cotton and cotton perle threads.
The stitches were worked in a spiral.
The running stitch did not work as well as the chain and stem stitches when creating curved lines, possibly due to the thickness of the threads used.
There was a nice contrast between the matt and the shiny threads when worked close together.

                                            -------------------------------------------------

Sample 12:
Sample 12
Sample 12 shows randomly placed cross stitches worked in stranded cotton, cotton perle and soft cotton threads.
When the stitches were worked close together the colours appear darker.
The stitches overlap producing alot of texture.
The use of different types of threads creates alot of contrast.

                                               -----------------------------------------------------

I enjoyed producing these samples.

The limited pallette of thread colours helped identify the changes that happened when stitching. Sometimes the colours used distracts your eye.

There was such a difference in the look of each stitch when worked in a thin thread and then a thick one. I really liked the samples where the colours of thread changed due to the direction in which they were stitched.

This is possibly just a fraction of samples that could have been produced to explore marks and lines in stitch techniques - it will have to be an ongoing record. As I come across more effects, I will have to store them in a sketchbook.

Hopefully, this stage will help me with Stage 3 when I have to produce a sample from one of my drawings in stitch.
The finished sampler
                                                   -----------------------------------------

 The finished page:
Sampler with notes
                                          -------------------------------------------------------